
The 3 Form Mistakes Responsible For 95% Of Joint Pain From Lifting
Can I tell you something unbelievable?
I’ve been lifting weights since 2009. I’ve been obsessed with lifting weights for over ten years. I’m a doctor of a physical therapy, which essentially means I’m a doctor in lifting weights.
…and I still don’t have all the answers!
But I’ve learned a lot, and I want to help you. Specifically, I’d love to help you protect your joints.
Because even though I don’t know it all, I know that these three form mistakes are bad for your joints. And I see people make these mistakes every day.
That word I used up there is controversial. “Bad.” In physical therapy school, they tell us not to say “bad” - especially when speaking generally - because it’s too simple and sets negative patient expectations.
Instead, “it depends” is our go-to. It leaves room for nuance and context.
I don’t want to leave any room today. Everyone should avoid these three mistakes.
Flaring the elbows on bench press and push ups
Allowing the knees to cave in while squatting
Lifting with excessive lumbar extension
You know this already, but I’ll remind you. Understanding proper form is your key to maximizing muscle growth and minimizing joint pain.
First I’ll debunk the myth that lifting weights is inherently harmful to your joints. When done right, it's an excellent tool for achieving your fitness goals.
Then, we’ll dive into each mistake so you know exactly what to avoid.
If you suffer from shoulder, knee, or low back discomfort, these tips are the first step to lifting and living without pain.
Is lifting weights harmful for joint health?
It's a prevalent misconception that lifting weights inherently jeopardizes your joint health.
However, the truth lies in a deeper understanding of this topic, supported by scientific research. Let's dispel these misconceptions:
Weight lifting, in general, isn’t dangerous (especially when compared to other sports)
Resistance training does not inherently increase joint pain. Many studies suggest that it reduces it.
Lifting weights with poor form can indeed be detrimental to your joints. But the key takeaway is that it's the form, not the weights themselves, that poses the risk.
Good form acts as a protective shield for your joints.
When your body moves correctly during weightlifting exercises, the load is distributed efficiently, reducing the stress placed directly on your joints. This, in turn, minimizes the risk of chronic discomfort and long-term issues.
Mastering proper form is the gateway to reaping the rewards of weightlifting without compromising your joint health. If you understand what mistakes to avoid, you can make faster progress and suffer fewer set backs.
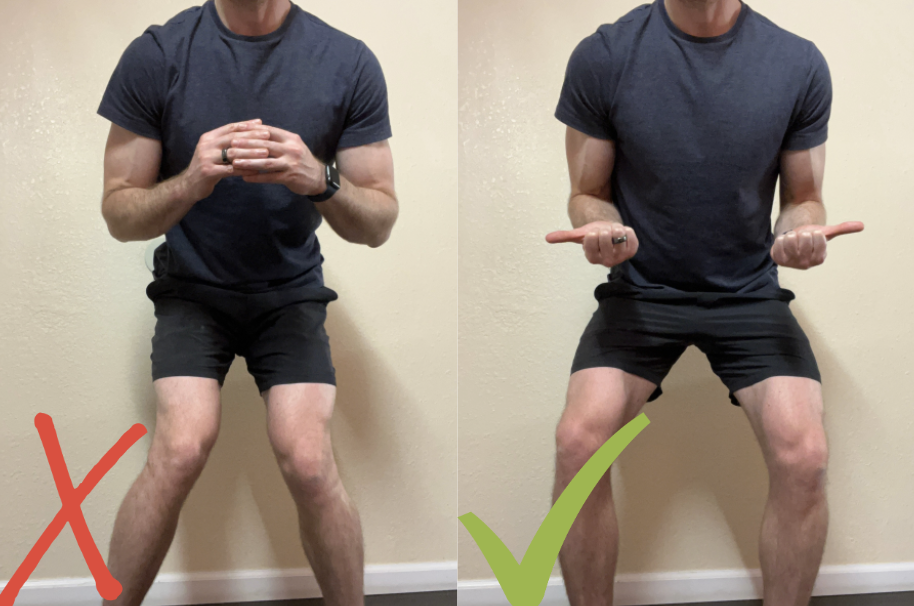
Mistake #1 - Flaring the elbows on bench press and push ups.
Flaring the elbows on pressing movements occurs when you allow your elbows to move outward during exercises like the bench press or overhead press. Instead of maintaining a controlled, tucked-elbow position, they drift away from your body.
When your elbows flare during pressing, it disrupts the optimal alignment of your joints. This misalignment increases the stress on your shoulder joint, potentially leading to discomfort and even injury (shoulder impingement and rotator cuff tendonitis, specifically) over time.
To rectify this mistake and preserve your joint health, here are actionable steps to follow. (These are specific t the bench press but can be applied to any upper body push exercise:
Focus on elbow positioning: Don’t allow the elbows to flare out to the side. Maintain a 45-75 degree angle between your elbows and torso.
Set up with your shoulder blades down and back: Think about squeezing a grape between your shoulder blades and driving your shoulder blades down into your back pocket. No need to keep them “glued down” in that position throughout the set, but starting here will you set you up with good stability.
Squeeze the life out of the bar: Grip the bar as tight as you possibly can. White knuckles.
Try to bend the bar in half: You won’t be able to (probably), but this will help you engage your lats and improve stability.
“Pull” the bar down to your chest: Don’t let gravity do the work and have the bar crash to your chest. Actively drive the bar down - under control - for better power on the way up.
Think about pushing your upper back into the bench instead of pushing the bar up: Try to imprint your upper back into the bench. This will help you keep tension in your back and maintain a “stable base” to press from.

By maintaining a good elbow position when pressing, you reduce the strain on your shoulder and put more stress on your muscles, enhancing the effectiveness of your sets. Better results with less joint pain.
Now that we've tackled the issue of elbow flaring, it's time to shift our attention to Mistake #2: Squatting with knees caving in.
Mistake #2 - Allowing the knees to cave in while squatting.
Squatting with knees caving in occurs when your knees deviate inward during the descent and ascent of the squat. Instead of tracking in line with your toes, they angle inward, compromising your lower body alignment.
When your knees cave in during squats, you place undue stress on your the inside of your knee joints. The resulting problems may include:
Patellar or quad tendonitis
Patellar tracking disorder
Anterior or medial knee pain
Ligament injuries
Over time, these issues can lead to discomfort, reduced mobility, and injury.
To rectify this mistake and maintain proper knee alignment during squats, follow these actionable guidelines:
Focus on your foot placement: Ensure that your feet are shoulder-width apart and that your toes are pointing straight ahead or slightly outward. A toe angle between 0-15 degrees is a good sweet spot.
Drive your knees out: Throughout the squat, concentrate on keeping your knees in line with your toes. Don’t let them dip in.
Spread the floor with your feet: With about 25% pressure, try to bust out the side of your shoes and a make a hole in the floor. Your feet won’t move, but creating this tension can increase activation of your glutes and improve stability.
Sit back: Reach your butt back like you’re sitting on a toilet. Your hips should go back and your knees should bend at the same time.
Keep heel, big toe, and little toe down: Think about maintaining the three points of contact - heel, big toe, and little toe. This will help you keep your balance and transfer as much force as possible into the ground.
The squat is referred to as the “king” of exercises because it’s functional and trains nearly every muscle in your body.
Sadly, lot of people miss out on these benefits because they can’t squat without pain and/or they’re afraid of hurting themselves.
Keep these tips in mind to keep squats in your routine without risking knee pain. We want to keep the burn in your quads, hamstrings, and glutes, not your knees.
Now, onto our final and most controversial tip. Mistake #3 - Lifting with excessive lumbar extension.
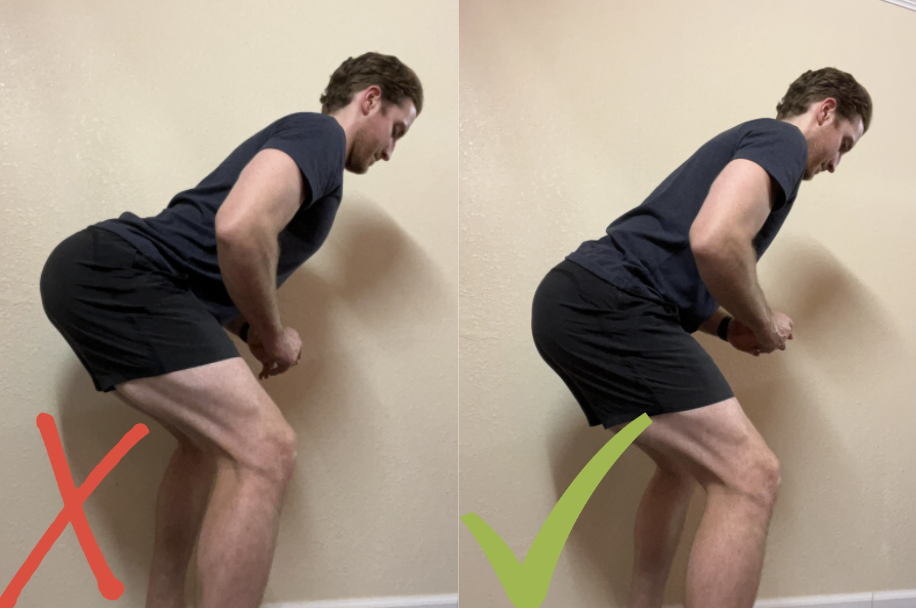
Mistake #3 - Lifting with excessive lumbar extension
Lifting with excessive lumbar extension, often referred to as overarching the lower back, occurs when you hyperextend your lower back during weightlifting exercises.
Over time, excessive lumbar extension can lead to problems such as muscular imbalance, lower back pain, and diminished spinal stability. These issues can compromise your ability to perform exercises effectively and may even limit your range of motion.
Now, this one’s controversial because lumbar extension is not inherently a harmful position. Plenty of people without pain have excessive lumbar extension and it does not always manifest in pain or dysfunction.
That said, it is not a good idea to perform weighted squats/hinges with an excessive amount of lumbar extension. There is no question that it can lead to muscular imbalance (i.e. tightness in your lumbar extensors and hip flexors and weakness in glutes and core) which can lead to pain over time.
To rectify this mistake and protect your spine, follow these actionable steps:
Brace your core: Think about holding a marble in your belly button. Concentrate on avoiding excessive arching of the lower back during lifts. Engage your core muscles to maintain a stable, neutral spine.
Reach your butt back: Try to reach your hips back toward the opposite wall.
Tuck your tail bone and keep your ribs down: If your tail bone was a flashlight, shine the light down. Don’t let your ribs flare up as you move your hips back.
Shift your weight back - If your weight is on your toes, you’ll be more likely to over extend your low back.
Keep your chin tucked: This will keep your neck in a good position and prevent too much extension through the low back.
By mastering the art of lifting with a neutral spine, you significantly reduce the risk of lower back pain and spinal issues. Plus, you’ll gain more strength where you want - your core and glutes.
Instead of a mere recap, let's delve deeper into these key concepts and offer you a clearer roadmap to lasting joint health and strength.
The Bottom Line - Lifting Weights Makes Your Joints Stronger
Lifting weights is a remarkable tool for transforming your body, enhancing your health, and boosting your confidence. When you approach it with a commitment to proper form, you unlock a world of progress without risking chronic pain.
Lifting weights is not to be feared but embraced, as it's your gateway to building lean muscle, improving your metabolism, and supporting your overall well-being.
Strength and stability are not mere luxuries; they are the guardians of your quality of life. As you age, these two attributes become increasingly valuable, as they can spell the difference between staying active and independent or facing a decline in mobility and function.
Don’t sleep on this fact - Strength training is one of the most effective ways to prevent joint pain over time. By strengthening the muscles that support your joints, you provide them with the armor they need to withstand the rigors of everyday life.
As a physical therapist, I'm here to support you in your pursuit of pain-free, effective, and enjoyable exercise.
Whether you have questions, need clarification, or are seeking specific advice, feel free to shoot me a message.
Remember - I’m here for YOU to provide guidance and answers as you continue on your path. Reach out any time.
Or, schedule a free health assessment below. Either way, I look forward to hearing from you :-)
3 Steps You Can Take
Apply for coaching - If you’re ready to start, you can sign up for a free chat with me here. Best case, you change your life. Worst case, we draw up a road map to get you to your goals.
Sign up for my newsletter - If you’d like to hear more, sign up for my mailing list here.
Keep learning - You can check out my other articles here. Nobody asked me to, but I’ve spent a ton of time researching everything from artificial sweeteners to saturated fat to testosterone and more, so you don’t have to.
Best,
John